Check with your instructor to make sure the tray borders are properly reduced.
A sharp scalpel is needed for this procedure. It is a knife with a removable blade.
Take a paper towel and wipe the tray border completely dry. Sometimes I also flame the border briefly. Compound will spark if it is held motionless over the flame. Heat the compound by constantly moving it through the flame.
I first place the compound on the buccal (lingual) aspect of the tray to make sure it is firmly attached. Then with a moistened gloved hand I coax it on to the border. This will hold the compound in place and usually prevent the compound from going inside the tray. (If the compound does eventually go inside the tray, cut it off with a scalpel before continuing.)
Shape the compound so it looks like a denture border (smooth, rounded). You may need to move it in and out of the flame to make it smooth, rounded and shiny. Anneal and place in the mouth so the frenum line up with their counterparts on the tray.
You have to gently mold the lip over the compound. You also have to LOOK at the compound to see if it captures the fold and the frenum. The frenum will not be imprinted on to the compound if you don't activate the lip.
After removing the tray from the mouth I dip it into a bowl of cold water. Maybe the compound is still soft?
I border mold from attachment to attachment. This is a preference, not a rule.
In the maxillary anterior there is usually an undercut, so the border molding is cantelevered toward the distal. Make sure the compound captures the undercut. You can push the compound into the fold and then bring down the lip to mold it to the proper length.
(Although there is no requirement I usually add compound to the maxillary posterior border. I first add a line of compound to the "polished" side of the tray following the border. After the tray is in the mouth I push the softened compound on to the palatal tissue. This serves to lengthen the tray, creates a better fit thus reducing the posterior flow of impression material.)
With the mandibular tray I border mold the same way...adding the hands-off routine.
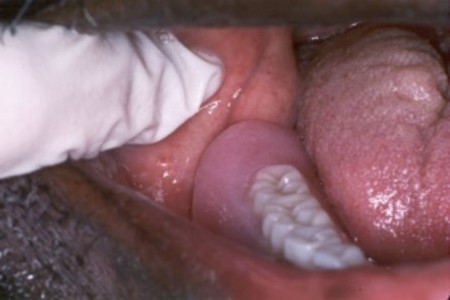
Sometimes the cheek overlies the mandibular disto-buccal border. Make sure this cheek tissue is NOT included in your impression. Pull the cheek aside and make your tray and border molding fit neatly into the buccal fold. When you make the impression, again pull the cheek aside when inserting the tray.
|
11. The cheek on the disto-buccal border is able to slide under the denture, because the final impression included the cheek. Push the cheek aside before taking the final impression so the cheek will rest on top of the denture. |
If the ridge is badly deleted (1-2 mm in height), I adjust the tray border to the mucobuccal fold and sometimes do not border mold that area. The most likely areas left free of compound are the distobuccal and the anteriolabial. The lingual has to be border molded. Most of the time the tray is completely border molded.
The length of the lingual border molding is determined by the side to side movements of the tongue. Notice that the lingual flange is longer than the buccal flange (on the mandibular). Your denture will have this same shape.
When the border molding is completed the tray should have the outline of the finished denture. The compound will have a dull finish when dry. If the compound is shiny, then it was either too cold when you put it in the mouth or it didn't reach the fold.
| Previous page | Next page |
©1999 by Julius Rosen, D.D.S.